
Anyway, to the point of this post: how I clean and season a cast iron pan:
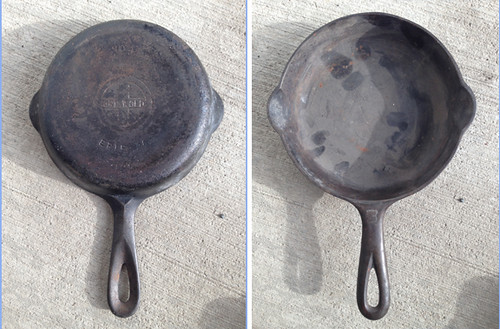
Step 1) Find a cast iron pan. This is a Griswold #3 skillet, 6" diameter, made between 1939 and 1944. I found this in an antique shop here in La Grande on Monday. It seemed to be in pretty good condition, and wasn't too gunky and rusty, so I bought it.
This isn't the most dramatic pan I could have found to demonstrate, but oh well. Here it is in as-bought condition, dust and all.
Step 2) Strip off the old crusty, gunky, sticky, dirty seasoning. There are a number of ways to do this.
- One oft-recommended method is to put the pan in the oven and run the self-clean cycle. This is quite effective at burning off all the organic material from the metal. You're left with bare metal and a powdery coating of ash which is easily washed off. The oven will not remove rust. I used the oven method on a pan in the past, and it stinks up the house. Though it works, and while I got lucky on the one I did, a major drawback is that it could warp or even crack the pan due to the temperature fluctuations of the self-cleaning cycle. I would not recommend this method, or even worse, the common suggestion to chuck it in a campfire. Not if you value the pan and want to keep it in good condition.
- The second oft-recommended way to clean a gunky iron piece is to put it in a trash bag and liberally coat it with heavy duty oven cleaner, then let it sit until the gunk is softened up and will wash right off. Depending on the depth of gunk, it can take anywhere from a day to a week or more, and it may need to be re-sprayed. I used this method exactly once, and said never again. It's horrendously messy. It worked fine and took the pan down to bare metal without the risk of warping, but great googly, what a mess when opening the bag to take out the piece. Plus, oven cleaner is primarily lye (sodium hydroxide, NaOH), and it made me very uncomfortable to be spraying that, not to mention dripping it around when trying to get the pan out of the bag and rinsed off. I wore gloves and eye protection, but I could still smell the fumes and I don't want aerosolized lye in my lungs. So that method is off the table for me from now on.
- The third cleaning method, and the one most recommended by cast iron collectors, is to use a lye bath. I was very hesitant to do this at first, because...lye, eek!.... but really it's fine. I got a 16-ounce container of lye (drain cleaner, 100% NaOH, no additives) at the hardware store and added it to five gallons of water in a 10-gallon heavy duty lidded rubbermaid bin. Never do it the other way around: never ever add water to lye, it generates heat and will literally boil up and try to hurt you. So lye into water, and voila, lye bath. Then you just
toss in the pancarefully place in the pan without splashing, and let it soak until the gunk wipes off. Easy peasy. The lye won't harm the iron, so a pan can stay in the lye bath indefinitely, until it's clean and I'm ready to season it.
The lye bath can be reused to clean many pans, even if it gets really cruddy and black. So there you go. I need to find more pans to clean.
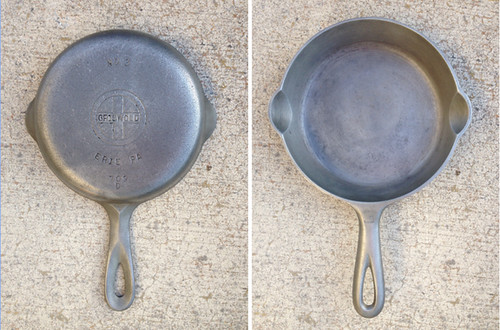
This pan wasn't too bad and only took overnight to get clean in the lye, but one of the others I got was so caked that it's been in the lye almost a week and it still has some crusty spots. So here you go, a formerly yukky pan, now down to bare metal, ready for re-seasoning.
Step 3) De-rust, if necessary. This pan wasn't rusty, but if it had been I would have soaked it in the vinegar solution for up to an hour at a time and scrubbed with steel wool to get off the rust. Unlike the lye, vinegar will eat away at the metal, and you can't leave it soaking for a long time. Frequent checks required!
There is an alternative method to getting rust off, which is using electrolysis. It involves a car battery charger, an electrolyte solution, and a piece of sacrificial metal, and is more expensive and involved than I want to deal with right now. It apparently works great, though, especially on intricate or heavily rusted pieces. Plus, less scrubbing.
I don't have any pictures of de-rusting yet, because that piece is still in the lye bath. Stay tuned.
Step 4) Re-season. Once the old seasoning is stripped off and the rust is gone, you're left with bare iron. Once you're at that point, you need to re-season immediately, or at least get a coat of oil on the pan, because it wants to start rusting right away. You may get a little flash-rust during drying, but that's ok because it will rub off with the first coat of oil.
- Start with scrubbing and rinsing well, you can even wash with dish soap (for the last time ever) if you want. Then dry the pan and put it in a low oven, about 200-225 degrees F, so that all the moisture evaporates. Put the pan in the cold oven, so it heats up slowly with the oven. Leave it in for 15-20 minutes.
- Once the oven is at temperature and the pan is hot, take it out and give it a good coat of oil. The internet has many people with many strongly-held beliefs about which oil is better than which other oil, but I use solid vegetable shortening (Crisco) and it works fine. Wipe on a good coat so the whole pan is glistening, inside and out, then take a clean paper towel (or cloth if the surface is rough and shreds paper towels) and wipe it all off. No, really, wipe it like you want to get all that oil back off. A very very very thin layer will be left on the metal, and that's all you want. A thick layer will pool and spot and get sticky. A thin layer will polymerize evenly and give the hard slick coating you want.
- Put the pan back in the oven, upside down, and turn it up to 350 F. You put it upside down so there is minimal contact between the pan and the oven rack, otherwise the bottom of the pan might season unevenly. You won't need to worry about drips if you wiped the oil off sufficiently.
- Wait 15-20 minutes, then give the pan another wipe down with a dry cloth, just to make sure there's no excess oil.
- Put it back in the oven, upside down again, and turn it up to 450F. Leave it in for 30 minutes once it's up to temperature, then turn the oven off and let it cool completely without opening the oven.
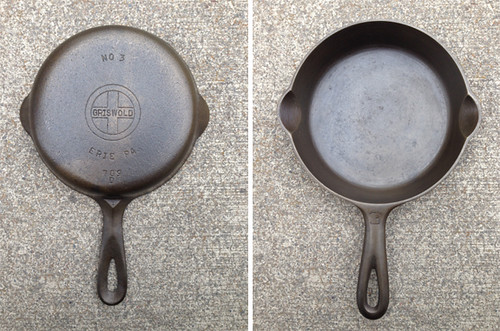
Here's the final seasoned pan. Isn't it pretty!! I love it. This cute little pan is the perfect size for an egg or two. Or a 2 serving cornbread!
If you're just re-seasoning one of your own pans that's in reasonable condition, and not one that you dug out of the bottom shelf of an antique store, you may not need to do the whole lye bath/de-rusting thing and take it completely down to bare metal. You can just scrub really well with soap and hot water to get the majority of the old sticky seasoning off, then rinse, dry, and continue on with Step 4. If the surface is uneven with caked old seasoning, though, you might still want to strip it completely.
After cooking, I don't wash my pans with soap, I just scrape out any food bits, rinse if needed, and wipe it dry. Then I heat it up gently on the stove to completely dry it and wipe on a very very very thin layer of bacon grease or veggie oil if it's needed. I usually use bacon grease because I have a little jar right there next to my stove and it's handy. I heat it until it just barely starts to smoke then turn off the burner, wipe it with a clean towel to make sure there's no excess oil, and leave the pan on the burner to cool slowly. Done and ready for next time. It took longer to type all that than it actually takes to clean and dry the pan.
I'm a convert, not that I ever used anything but uncoated stainless steel pans anyway (no Teflon in my house!). But eggs are so much more fun to cook in cast iron! Use your cast iron pans and enjoy them, they're great!
1 comment:
Thanks for these very good instructions! I love my cast iron and use it often when I'm cooking on the woodstove.
I have an æbleskiver skillet that needs some work, and now I feel ready for the job!
Post a Comment